Adding a relevant photo or video can be very effective and informative for your blog.
1. Adding a photo to your blog.
To add a photo click on the Add image button on the formatting bar (highlighted in red rectangle, first icon).

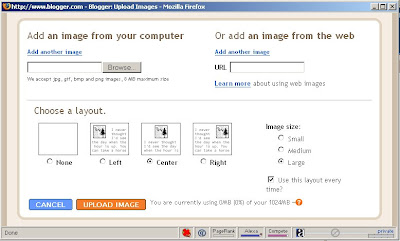
A new window will open like this.

If you want to upload a photo from your own computer then click on Browse button and browse through your computer and select. If you want to add a photo from the web then copy the image’s address and paste it in the space beside URL tag on the right side.
Remember if you are putting image from website then make sure that the image is going to be stayed at its original website forever otherwise if the original image is removed, replaced or renamed then it will also affect on your blog.
You can also select the position of the image from Left, Right and Center option. Likewise you can also select the image size from Small, Medium and Large and make your settings default from the tick mark option given at bottom right.
When you are done selecting all preferences, click on “I accept…” (will be asked only once) and then click UPLOAD IMAGE button, wait until the image is uploaded to the server of Blogger and then click Ok. Now you are done adding the image. You can also move the image and resize it inside the post editor.
2. Adding video to your blog.
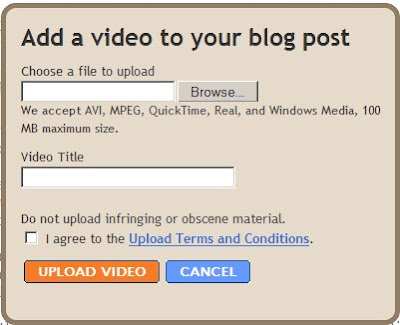
To add video, click on the Add Video button (highlighted in red rectangle, second icon) and a window will pop up like this.
 Browse through your computer and select your video. Blogger supports AVI, MPEG, QuickTime, Real and Windows Media up to size of 100 Mb. Give a suitable video title in the title box, check mark the “I agree…” box and click UPLOAD VIDEO. Wait until the video is uploaded to Blogger’s server and then you are done!


2 comments:
but what if You want to design your own?
gre8
Post a Comment