Subscribe

RSS Feed (xml)

Powered By

Design:
Blogger

Powered by Blogger

Saturday, September 29, 2007

Back up your blog’s current template

You love your blog (obviously!) and won’t try to mess up with its looks and template coding (For changing template) or editing its sidebars without you don’t have its backup or when you are not sure that what exactly will your blog look like after you edit. Changing your blog’s template is like a new fresh look of your blog or wearing new clothes but not advised to change it frequently though.

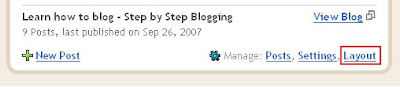
Now, to backup your blog’s current template, sign in to Blogger (of course), on the dashboard click on Layout,

Then under Edit HTML option you will find Download Full Template.
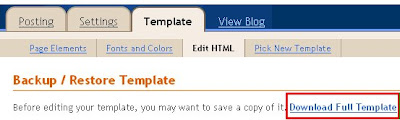


Here you go, save it on your pc. It will be saved in XML format. You can now restore (if needed) your saved xml template by clicking on Browse button and upload.



Wednesday, September 26, 2007

Editing, enabling or disabling your profile. Uploading a photo to your profile.

A good and effective profile can attract people towards your blog. It shows how much you are attached to your blog and what are your ideas. Your well made profile can reflect your personality, interests and about your personal life too.

Editing your profile is quite simple and fun. On the dashboard of your Blogger account, you can see Edit Profile. By default your profile is public but if you don’t wish others to view your profile then you may simply disable your profile view by selecting the option “Share my profile”. You can also select which blogs you want to share in your profile page by “Select blogs to display” option. You can change the “Display name” that appears at the end of each blog post you post.

Uploading a photo for profile is also simple. Here you cannot directly put the image from your computer but you have to have an image uploaded somewhere on the web. Don’t worry about that. There are plenty of websites which provide you free image hosting service. You can search in Google typing keyword “free image hosting” below.


Google


Upload an image, get the direct code for the image and then paste it in the Photo URL box.

There is a little fun here in profile. You will find Random Question box at the bottom. Select Give me a new question and Save Profile. You will see that Blogger has given you a funny random question. If you find it is really funny and you want to comment or give a funny answer type in the box next to it and save. You can also ask for new question by selecting that check box again.

Tuesday, September 18, 2007

How to edit or delete your blog’s previous post?

When you want to edit or delete any of your previous post or draft (the post that you haven’t published yet), click on the Posts link on your dashboard.


Now you can see a list of your published and unpublished (drafts) posts. You can edit or delete any of your posts. Other interesting feature is that you can add or apply Labels or post tags (which are very important as the keywords of your posts for search engines) to your posts easily by selecting multiple posts at a time!

Sunday, September 16, 2007

How to add photo and video to your blog

Adding a relevant photo or video can be very effective and informative for your blog.

1. Adding a photo to your blog.

To add a photo click on the Add image button on the formatting bar (highlighted in red rectangle, first icon).


A new window will open like this.


If you want to upload a photo from your own computer then click on Browse button and browse through your computer and select. If you want to add a photo from the web then copy the image’s address and paste it in the space beside URL tag on the right side.

Remember if you are putting image from website then make sure that the image is going to be stayed at its original website forever otherwise if the original image is removed, replaced or renamed then it will also affect on your blog.

You can also select the position of the image from Left, Right and Center option. Likewise you can also select the image size from Small, Medium and Large and make your settings default from the tick mark option given at bottom right.

When you are done selecting all preferences, click on “I accept…” (will be asked only once) and then click UPLOAD IMAGE button, wait until the image is uploaded to the server of Blogger and then click Ok. Now you are done adding the image. You can also move the image and resize it inside the post editor.

2. Adding video to your blog.

To add video, click on the Add Video button (highlighted in red rectangle, second icon) and a window will pop up like this.

Browse through your computer and select your video. Blogger supports AVI, MPEG, QuickTime, Real and Windows Media up to size of 100 Mb. Give a suitable video title in the title box, check mark the “I agree…” box and click UPLOAD VIDEO. Wait until the video is uploaded to Blogger’s server and then you are done!

How to create hyperlinks on your blog content

When you post your content on your blog, sometimes you need to place hyperlinks. Hyperlinks are the text that contains links of any web address either of your own site or other site. For example you type “I love Google and it is the best search engine ever!” This link is called outbound link and other one is inbound link which redirects the page within your own website or blog for example “From here you can start learning blogging.”

To add a link to any keyword on your blog post, simply select that keyword and then click on “Link” button on the formatting bar (highlighted in red circle).

A small window will open, paste or type your desired url or web address or link in it and press Ok. Now the link is added you can preview it from clicking Preview button from extreme right side.